Android Spinner Example

In this example we will see how to work with spinners in android. Spinners are used for selecting one value from a given set like the drop down list. We will create dependent spinner i.e the entries of the second spinner depends on the value selected in the first spinner.

In this sample application we will have two spinner first one for selecting country and the other for selecting city. Depending on the country selected in the first spinner the cities in the second spinner changes.

Lets start:

1.Create an Android Application Project (File->New->Android Application Project). While creating the project name the Activity as MainActivity(MainActivity.java) and the layout file as activity_main (activity_main.xml).

2.When done with creating the project add array resources to your strings.xml file in res/values folder which will serve as the data source for the spinners.

strings.xml:

<resources>

<string name="app_name">Spinner</string>
<string name="hello_world">Hello world!</string>
<string name="title_activity_main">MainActivity</string>

<string-array name="country_array">
<item>India</item>
<item>Pakisthan</item>
<item>Sri Lanka</item>
</string-array>
<string-array name="city_india">
<item>Mumbai</item>
<item>Chennai</item>
<item>Kolkata</item>
<item>Bangalore</item>
</string-array>
<string-array name="city_pakisthan">
<item>Karachi</item>
<item>Lahore</item>
<item>Faisalabad</item>
<item>Rawalpindi</item>
</string-array>
<string-array name="city_srilanka">
<item>Colombo</item>
<item>Dehiwala-Mount Lavinia</item>
<item>Moratuwa</item>
<item>Kotte</item>
</string-array>
</resources>


3.Design the UI with a TextView & two Spinners and assign default entries for the spinners.

activity_main.xml:

<?xml version="1.0" encoding="utf-8"?>
<RelativeLayout xmlns:android="http://schemas.android.com/apk/res/android"
android:layout_width="match_parent"
android:layout_height="match_parent"
android:gravity="left" >

<TextView
android:id="@+id/textView"
android:layout_width="130dp"
android:layout_height="50dp"
android:layout_alignParentTop="true"
android:layout_centerHorizontal="true"
android:layout_marginTop="15dp"
android:gravity="center"
android:text="Select County and City"
android:textSize="15dp"
/>

<Spinner
android:id="@+id/spinnerCountry"
android:layout_width="wrap_content"
android:layout_height="wrap_content"
android:layout_below="@+id/textView"
android:layout_centerHorizontal="true"
android:layout_marginTop="28dp"
android:entries="@array/country_array" />

<Spinner
android:id="@+id/spinnerCity"
android:layout_width="wrap_content"
android:layout_height="wrap_content"
android:layout_alignLeft="@+id/spinnerCountry"
android:layout_below="@+id/spinnerCountry"
android:layout_marginTop="42dp"
android:entries="@array/city_india" />

</RelativeLayout>

4.Now in the Activity file we will create the spinners instances and change the adapters data-source for the second spinner(city) depending on the value selected in the first spinner(country). This is done in the onItemSelected callback method of the first spinner.

MainActivity.java:
import android.app.Activity;
import android.os.Bundle;
import android.view.View;
import android.widget.AdapterView;
import android.widget.AdapterView.OnItemSelectedListener;
import android.widget.ArrayAdapter;
import android.widget.Spinner;

public class MainActivity extends Activity implements OnItemSelectedListener {

 Spinner spinnerCountry, spinnerCity;

 @Override
 protected void onCreate(Bundle savedInstanceState) {
  super.onCreate(savedInstanceState);
  setContentView(R.layout.activity_main);
  spinnerCountry = (Spinner) findViewById(R.id.spinnerCountry);
  spinnerCity = (Spinner) findViewById(R.id.spinnerCity);
  spinnerCountry.setOnItemSelectedListener(this);
 }

 @Override
 public void onItemSelected(AdapterView<?> parent, View arg1, int pos,
   long arg3) {
  parent.getItemAtPosition(pos);
  if (pos == 0) {
   ArrayAdapter<CharSequence> adapter = ArrayAdapter
     .createFromResource(this, R.array.city_india,
       android.R.layout.simple_spinner_item);
   spinnerCity.setAdapter(adapter);
  } else if (pos == 1) {
   ArrayAdapter<CharSequence> adapter = ArrayAdapter
     .createFromResource(this, R.array.city_pakisthan,
       android.R.layout.simple_spinner_item);
   spinnerCity.setAdapter(adapter);
  } else if (pos == 2) {
   ArrayAdapter<CharSequence> adapter = ArrayAdapter
     .createFromResource(this, R.array.city_srilanka,
       android.R.layout.simple_spinner_item);
   spinnerCity.setAdapter(adapter);
  }
 }

 @Override
 public void onNothingSelected(AdapterView<?> arg0) {
 }
}


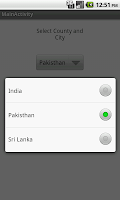
5.Run the application by right clicking the project Run As->Android Application. You would see and output similar to the one below

Output:


Android Display Running Application Process Programmatically – Example

In this post we will see how to display all the running application process in a device or emulator.  It can be done by creating an instance for the ActivityManager Class . In this sample application we will get the list of running app process in a List and will display it in a TextView .


So lets start:


1.Create a new project File ->New -> Project ->Android ->Android Application Project. While creating the new project, name the activity as MainActivity(MainActivity.java)and layout as activity_main.xml.

2.Now let us design the UI for the MainActivity i.e activity_main.xml with a TextView.

activity_main.xml:


<RelativeLayout xmlns:android="http://schemas.android.com/apk/res/android"
    xmlns:tools="http://schemas.android.com/tools"
    android:layout_width="match_parent"
    android:layout_height="match_parent"
    tools:context=".MainActivity" >

    <TextView
        android:id="@+id/textView"
        android:layout_width="wrap_content"
        android:layout_height="wrap_content"
        android:text="Running Apps \n" />

</RelativeLayout>


3.Now in the MainActivity use ActvityManager instance and get the appropriate system service and list them in a textview.

MainActivity.java:

package com.example.piolt;

import java.util.List;

import android.app.Activity;
import android.app.ActivityManager;
import android.app.ActivityManager.RunningAppProcessInfo;
import android.os.Bundle;
import android.widget.TextView;

public class MainActivity extends Activity {

 @Override
 protected void onCreate(Bundle savedInstanceState) {
  super.onCreate(savedInstanceState);
  setContentView(R.layout.activity_main);

  TextView tv = (TextView) findViewById(R.id.textView);

  ActivityManager activityManager = (ActivityManager) this
    .getSystemService(ACTIVITY_SERVICE);

  List<RunningAppProcessInfo> procInfos = activityManager
    .getRunningAppProcesses();
  for (int idx = 0; idx < procInfos.size(); idx++) {

   tv.setText(tv.getText() + "" + (idx + 1) + "."
     + procInfos.get(idx).processName + "\n");

  }

 }

}

4.Run the project by rightclicking project Run as android project in an android device.


Output:


The output of this example would be similar to the one as follows:


Android Accelerometer Example


In this sample application we will put the android accelerometer sensor into use . Nowadays accelerometer is used more in motion games where the user tilts the phone for a specific action to take place or used for shake detection. It has become common to shake the device to reset the application or erase a canvas in paint apps.

In this example we will change the image in the ImageView with respect to the users actions (like tilting the phone up,down right and left).Like we used for the proximity sensor example we use the SensorManager class and get the accelerometer sensor service. On the overridden method onSensorChanged we monitor the sensor values of all 3 axises (x ,y & z). Keep a threshold valued of 2.0 for center and change the image according the the axis values. Hope you got the idea.


Now lets start:

1.Create a new project File ->New -> Project ->Android ->Android Application Project. While creating the new project, name the activity as AccelerometerActivity(AccelerometerActivity.java) and layout as activity_accelerometer.xml.

2.Now let us design the UI for the AccelerometerActivity i.e activity_accelerometer.xml with an ImageView and a TextView.Have images in drawable folder to differentiate each tilting motion(Here I have images for center,top,right,bottom and left).

activity_accelerometer.xml


<RelativeLayout xmlns:android="http://schemas.android.com/apk/res/android"
xmlns:tools="http://schemas.android.com/tools"
android:id="@+id/relative"
android:layout_width="fill_parent"
android:layout_height="fill_parent" >
<TextView
android:id="@+id/txt"
android:layout_width="fill_parent"
android:layout_height="wrap_content"
android:textSize="20dp"
android:text="Tilt the phone to see the difference" />

<ImageView
android:id="@+id/imageView1"
android:layout_width="fill_parent"
android:layout_height="fill_parent"
android:layout_below="@+id/txt"
android:layout_centerHorizontal="true"
android:scaleType="fitXY"
android:src="@drawable/center" />
</RelativeLayout>

3.Now in the AccelerometerActivity use a logic to identify the tilting action and replace the images accordingly. Do not forget to unregister the sensor to save battery.

AccelerometerActivity.java 

import android.app.Activity;
import android.content.Context;
import android.hardware.Sensor;
import android.hardware.SensorEvent;
import android.hardware.SensorEventListener;
import android.hardware.SensorManager;
import android.os.Bundle;
import android.widget.ImageView;
import android.widget.TextView;

public class AccelerometerActivity extends Activity implements
  SensorEventListener {

 private SensorManager mSensorManager;
 private Sensor mAccelerometer;
 TextView title;
 ImageView iv;

 @Override
 public void onCreate(Bundle savedInstanceState) {
  super.onCreate(savedInstanceState);
  setContentView(R.layout.activity_accelerometer);
  mSensorManager = (SensorManager) getSystemService(Context.SENSOR_SERVICE);
  mAccelerometer = mSensorManager
    .getDefaultSensor(Sensor.TYPE_ACCELEROMETER);
  title = (TextView) findViewById(R.id.txt);
  iv = (ImageView) findViewById(R.id.imageView1);
 }

 @Override
 public void onAccuracyChanged(Sensor arg0, int arg1) {
  // TODO Auto-generated method stub
 }

 @Override
 public void onSensorChanged(SensorEvent event) {
  float x = event.values[0];
  float y = event.values[1];
  float z = event.values[2];
  if (Math.abs(x) > Math.abs(y)) {
   if (x < 0) {
    iv.setImageResource(R.drawable.right);
   }
   if (x > 0) {
    iv.setImageResource(R.drawable.left);
   }
  } else {
   if (y < 0) {
    iv.setImageResource(R.drawable.top);
   }
   if (y > 0) {
    iv.setImageResource(R.drawable.bottom);
   }
  }
  if (x > (-2) && x < (2) && y > (-2) && y < (2)) {
   iv.setImageResource(R.drawable.center);
  }
 }

 @Override
 protected void onResume() {
  super.onResume();
  mSensorManager.registerListener(this, mAccelerometer,
    SensorManager.SENSOR_DELAY_NORMAL);
 }

 @Override
 protected void onPause() {
  super.onPause();
  mSensorManager.unregisterListener(this);
 }
}


4.Run the project by rightclicking project Run as → android project in an android device.

Output:

The output of this example would be similar to the one as follows:


Android Proximity Sensor Example


Every android mobile is shipped with sensors to measure various environmental conditions. In this example we will see how to use the proximity sensors in an android application. Proximity sensors would be useful to reveal the nearness of an object to the phone. We might often experience that our phone screen would turn off when we bring the phone to our ears when we are in a call and the screen will turn on when we take it back. This is because the proximity sensor recognizes the object near the phone.

In this example we will change the image in the ImageView w.r.t the nearness of any object to the phone. Check the sensor functionality by covering the sensor region (mostly the top left of the phone) with your hand .
So lets start

1.Create a new project File ->New -> Project ->Android ->Android Application Project. While creating the new project, name the activity as SensorActivity(SensorActivity.java) and layout as sensor_screen.xml.

2.Now let us design the UI for the SensorActivity i.e sensor_screen.xml with an ImageView.Have two images in drawable folder to differentiate near and far activity.

sensor_screen.xml:


<RelativeLayout xmlns:android="http://schemas.android.com/apk/res/android"
xmlns:tools="http://schemas.android.com/tools"
android:layout_width="fill_parent"
android:layout_height="fill_parent"
tools:context=".SensorActivity" >

<ImageView
android:id="@+id/imageView1"
android:layout_width="wrap_content"
android:layout_height="wrap_content"
android:src="@drawable/far" />

</RelativeLayout>

3.Now in the SensorActivity we access the device sensor using SensorManager, an instance of this class is got by calling getSystemService(SENSOR_SERVICE) . We implement the class with the SensorEventListener interface to override its methods to do actions on sensor value change.

SensorActivity.java:

import android.app.Activity;
import android.hardware.Sensor;
import android.hardware.SensorEvent;
import android.hardware.SensorEventListener;
import android.hardware.SensorManager;
import android.os.Bundle;
import android.widget.ImageView;

public class SensorActivity extends Activity implements SensorEventListener {
 private SensorManager mSensorManager;
 private Sensor mSensor;
 ImageView iv;

 @Override
 protected void onCreate(Bundle savedInstanceState) {
  // TODO Auto-generated method stub
  super.onCreate(savedInstanceState);
  setContentView(R.layout.sensor_screen);
  mSensorManager = (SensorManager) getSystemService(SENSOR_SERVICE);
  mSensor = mSensorManager.getDefaultSensor(Sensor.TYPE_PROXIMITY);
  iv = (ImageView) findViewById(R.id.imageView1);
 }

 protected void onResume() {
  super.onResume();
  mSensorManager.registerListener(this, mSensor,
    SensorManager.SENSOR_DELAY_NORMAL);
 }

 protected void onPause() {
  super.onPause();
  mSensorManager.unregisterListener(this);
 }

 public void onAccuracyChanged(Sensor sensor, int accuracy) {
 }

 public void onSensorChanged(SensorEvent event) {
  if (event.values[0] == 0) {
   iv.setImageResource(R.drawable.near);
  } else {
   iv.setImageResource(R.drawable.far);
  }
 }
}

4.Run the project by rightclicking project Run as → android project.

Output:

The output of this example would be similar to the one as follows:


View Microsoft Word Document In Android - Example


In this Example we will see how to view a ms word document through an android app. Here we will open the .doc file saved in the SD card with an application which can view the doc file such as Quick Office , Office suite or any other application capable of reading .doc or docx files.

On tapping a button we check for the existence of the .doc file in the SD card. If the file exists we call the reader application via Intents. In the due course if the reader application is not found it is notified by catching the exception ActivityNotFoundException.


So lets start:

1.Create an Android Application Project with any Project Name and Package Name. Create an Activity and Layout file for the same like MainActivity & activity_main.

2.Design the screen for the activity with a button as below

activity_main.xml:

<RelativeLayout xmlns:android="http://schemas.android.com/apk/res/android"
xmlns:tools="http://schemas.android.com/tools"
android:layout_width="fill_parent"
android:layout_height="fill_parent"
android:background="#FFFFFF"
android:paddingBottom="@dimen/activity_vertical_margin"
android:paddingLeft="@dimen/activity_horizontal_margin"
android:paddingRight="@dimen/activity_horizontal_margin"
android:paddingTop="@dimen/activity_vertical_margin"
tools:context=".Vibrator">

<TextView
android:id="@+id/textView1"
android:layout_width="wrap_content"
android:layout_height="wrap_content"
android:layout_alignParentTop="true"
android:layout_centerHorizontal="true"
android:layout_marginTop="124dp"
android:text="Welcome to AndroidBite !!!"
android:textColor="@android:color/black"
android:textSize="20sp"/>

<Button
android:id="@+id/bPressMe"
android:layout_width="wrap_content"
android:layout_height="wrap_content"
android:layout_centerHorizontal="true"
android:layout_centerVertical="true"
android:text="Press Me !!!"/>

</RelativeLayout>
3.Now in the activity, we create a File instance and construct it using specified directory and name. Then we set the Uri from the file instance and start the intent Intent.ACTION_VIEW . This intents data is set with the uri and the MIME Type for .doc file is set as application/msword before calling the intent.

For docx files use "application/vnd.openxmlformats-officedocument.wordprocessingml.document" as MIME type

MainActivity.java:
import java.io.File;

import android.app.Activity;
import android.content.ActivityNotFoundException;
import android.content.Intent;
import android.net.Uri;
import android.os.Bundle;
import android.os.Environment;
import android.view.View;
import android.view.View.OnClickListener;
import android.widget.Button;
import android.widget.Toast;

public class MainActivity extends Activity {

 @Override
 public void onCreate(Bundle savedInstanceState) {
  super.onCreate(savedInstanceState);
  setContentView(R.layout.activity_main);

  Button button = (Button) findViewById(R.id.bPressMe);

  button.setOnClickListener(new OnClickListener() {
   @Override
   public void onClick(View v) {

    File file = new File(Environment.getExternalStorageDirectory(),
      "Help Desk Voice Flow.doc");

    try {
     if (file.exists()) {
      Uri path = Uri.fromFile(file);
      Intent objIntent = new Intent(Intent.ACTION_VIEW);
      // replace "application/msword" with
      // "application/vnd.openxmlformats-officedocument.wordprocessingml.document"
      // for docx files
      // objIntent.setDataAndType(path,"application/msword");
      objIntent.setFlags(Intent.FLAG_ACTIVITY_CLEAR_TOP);
      startActivity(objIntent);
     } else {
      Toast.makeText(MainActivity.this, "File NotFound",
        Toast.LENGTH_SHORT).show();
     }
    } catch (ActivityNotFoundException e) {
     Toast.makeText(MainActivity.this,
       "No Viewer Application Found", Toast.LENGTH_SHORT)
       .show();
    } catch (Exception e) {
     e.printStackTrace();
    }
   }
  });

 }

}
4.Include the WRITE_EXTERNAL_STORAGE permission in the manifest file(permission for both reading and writing).
5.Run the application by right clicking the project Run As->Android Application. If everything goes well the output will be similar to the one below

Output:

View PDF In Android - Example


In this Example we will see how to view a pdf file through an android app. Here we will open the pdf file saved in the SD card with an application to view the pdf file like the Adobe Reader , Quick Office or any other application capable of reading pdf files.

In this application on tapping a button we check for the existence of the pdf file in the SD card. If the file exists we call the reader application via Intents. In the due course if the reader application is not found it is notified by catching the exception ActivityNotFoundException.


So lets start:

1.Create an Android Application Project with any Project Name and Package Name. Create an Activity and Layout file for the same like MainActivity & activity_main.

2.Design the screen for the activity with a button as below

activity_main.xml:
<RelativeLayout xmlns:android="http://schemas.android.com/apk/res/android"
    xmlns:tools="http://schemas.android.com/tools"
    android:layout_width="fill_parent"
    android:layout_height="fill_parent"
    android:background="#FFFFFF"
    android:paddingBottom="@dimen/activity_vertical_margin"
    android:paddingLeft="@dimen/activity_horizontal_margin"
    android:paddingRight="@dimen/activity_horizontal_margin"
    android:paddingTop="@dimen/activity_vertical_margin"
    tools:context=".Vibrator" >

    <TextView
        android:id="@+id/textView1"
        android:layout_width="wrap_content"
        android:layout_height="wrap_content"
        android:layout_alignParentTop="true"
        android:layout_centerHorizontal="true"
        android:layout_marginTop="124dp"
        android:text="Welcome to AndroidBite !!!"
        android:textColor="@android:color/black"
        android:textSize="20sp" />

    <Button
        android:id="@+id/bPressMe"
        android:layout_width="wrap_content"
        android:layout_height="wrap_content"
        android:layout_centerHorizontal="true"
        android:layout_centerVertical="true"
        android:text="Press Me !!!" />

</RelativeLayout>

3.Now in the activity, we create a File instance and construct it using specified directory and name. Then we set the Uri from the file instance and start the intent Intent.ACTION_VIEW . This intents data is set with the uri and the MIME Type for pdf is set as application/pdf before calling the intent.

MainActivity.java:
import java.io.File;

import android.app.Activity;
import android.content.ActivityNotFoundException;
import android.content.Intent;
import android.net.Uri;
import android.os.Bundle;
import android.os.Environment;
import android.view.View;
import android.view.View.OnClickListener;
import android.widget.Button;
import android.widget.Toast;

public class MainActivity extends Activity {

 @Override
 public void onCreate(Bundle savedInstanceState) {
  super.onCreate(savedInstanceState);
  setContentView(R.layout.activity_main);

  Button button = (Button) findViewById(R.id.bPressMe);

  button.setOnClickListener(new OnClickListener() {
   @Override
   public void onClick(View v) {

    File pdfFile = new File(Environment
      .getExternalStorageDirectory(), "Case Study.pdf");

    try {
     if (pdfFile.exists()) {
      Uri path = Uri.fromFile(pdfFile);
      Intent objIntent = new Intent(Intent.ACTION_VIEW);
      objIntent.setDataAndType(path, "application/pdf");
      objIntent.setFlags(Intent.FLAG_ACTIVITY_CLEAR_TOP);
      startActivity(objIntent);
     } else {
      Toast.makeText(MainActivity.this, "File NotFound",
        Toast.LENGTH_SHORT).show();
     }
    } catch (ActivityNotFoundException e) {
     Toast.makeText(MainActivity.this,
       "No Viewer Application Found", Toast.LENGTH_SHORT)
       .show();
    } catch (Exception e) {
     e.printStackTrace();
    }
   }
  });

 }

}
4.Include the WRITE_EXTERNAL_STORAGE permission in the manifest file(permission for both reading and writing).
5.Run the application by right clicking the project Run As->Android Application. If everything goes well the output will be similar to the one below

Output:

Android Voice Recognition Example


Google provides an option to search the web using voice command . Let us create a similar Voice Recognition Application( Speech to text Application) in android. In this example we will have a button to initiate speech recognition, by tapping on it we call the voice/speech recognition API where the voice is recognized and converted into text .Finally we will display the results that was recognized in a ListView.

Voice recognition featured in android is achieved using the RecognizerIntent.Use the Recognizer class in an intent to call the voice API.Here we check for the recognizer in the device if available the speech to text happen else we show a toast displaying 'Recognizer Not Found'

Note: This application will not work in emulator since it does not have the recognizer, so test it in a device and it also requires an internet connection.

So Lets Start:

1.Create an android application with any package name and project name.Name the Activity as VoiceActivity and the layout file as voice_demo.
2.Let us design the UI for the activity with a TextView,Button and ListView as follows

voice_demo.xml

<?xml version="1.0" encoding="utf-8"?>
<LinearLayout xmlns:android="http://schemas.android.com/apk/res/android"
    android:layout_width="fill_parent"
    android:layout_height="fill_parent"
    android:orientation="vertical" >

    <TextView
        android:layout_width="fill_parent"
        android:layout_height="wrap_content"
        android:layout_margin="20dp"
        android:text="Click the button below and start speaking"
        android:textSize="18dp" />

    <Button
        android:id="@+id/speakButton"
        android:layout_width="wrap_content"
        android:layout_height="wrap_content"
        android:layout_gravity="center_horizontal"
        android:background="@drawable/voic_img" />

    <ListView
        android:id="@+id/list"
        android:layout_width="fill_parent"
        android:layout_height="0dip"
        android:layout_weight="1" />

</LinearLayout>


3.In the Activity file we call the RecognizerIntent.ACTION_RECOGNIZE_SPEECH. Starts an activity that will prompt the user for speech and send it through a speech recognizer. The results will be returned via activity result.

VoiceActivity:

package com.example.voice;

import java.util.ArrayList;
import java.util.List;

import android.app.Activity;
import android.content.Intent;
import android.content.pm.PackageManager;
import android.content.pm.ResolveInfo;
import android.os.Bundle;
import android.speech.RecognizerIntent;
import android.view.View;
import android.view.View.OnClickListener;
import android.widget.ArrayAdapter;
import android.widget.Button;
import android.widget.ListView;
import android.widget.Toast;

public class VoiceActivity extends Activity {

 private static final int REQUEST_CODE = 1234;
 private ListView resultList;
 Button speakButton;

 @Override
 public void onCreate(Bundle savedInstanceState) {
  super.onCreate(savedInstanceState);
  setContentView(R.layout.voice_demo);

  speakButton = (Button) findViewById(R.id.speakButton);

  resultList = (ListView) findViewById(R.id.list);

  // Disable button if no recognition service is present
  PackageManager pm = getPackageManager();
  List<resolveinfo> activities = pm.queryIntentActivities(new Intent(
    RecognizerIntent.ACTION_RECOGNIZE_SPEECH), 0);
  if (activities.size() == 0) {
   speakButton.setEnabled(false);
   Toast.makeText(getApplicationContext(), "Recognizer Not Found",
     1000).show();
  }
  speakButton.setOnClickListener(new OnClickListener() {
   @Override
   public void onClick(View v) {
    startVoiceRecognitionActivity();
   }
  });
 }

 private void startVoiceRecognitionActivity() {
  Intent intent = new Intent(RecognizerIntent.ACTION_RECOGNIZE_SPEECH);
  intent.putExtra(RecognizerIntent.EXTRA_LANGUAGE_MODEL,
    RecognizerIntent.LANGUAGE_MODEL_FREE_FORM);
  intent.putExtra(RecognizerIntent.EXTRA_PROMPT,
    "AndroidBite Voice Recognition...");
  startActivityForResult(intent, REQUEST_CODE);
 }

 @Override
 protected void onActivityResult(int requestCode, int resultCode, Intent data) {
  if (requestCode == REQUEST_CODE &amp;&amp; resultCode == RESULT_OK) {
   ArrayList<string> matches = data
     .getStringArrayListExtra(RecognizerIntent.EXTRA_RESULTS);
   resultList.setAdapter(new ArrayAdapter<string>(this,
     android.R.layout.simple_list_item_1, matches));
  }
  super.onActivityResult(requestCode, resultCode, data);
 }
}


4.Alter the manifest file by enabling internet permission
<uses-permission android:name="android.permission.INTERNET" />
5.Run the application by right clicking the project Run As->Android Application.You would see and output similar to the one below

Output:


Android Radio Button / Radio Group Example


In this example we will see how to add radio buttons to our android application. We can render a radio button using android.widget.RadioButton class ,but having a single radio button is of no use. Android provides android.widget.RadioGroup to group the radio buttons so that if one radio button is selected within a group others are deselected. Here we will design a screen having radio button within a group and toast the selected item.

Lets start:

1. Create an android application with any packagename and project name. Name the activity as AndroidRadioActivity.java and the layout file as main.xml
2.Let us design the layout file with a TextView posting a question followed by radio buttons and a display button.

main.xml:
<?xml version="1.0" encoding="utf-8"?>
<LinearLayout xmlns:android="http://schemas.android.com/apk/res/android"
    android:layout_width="fill_parent"
    android:layout_height="fill_parent"
    android:orientation="vertical" >

    <TextView
        android:id="@+id/textView1"
        android:layout_width="wrap_content"
        android:layout_height="wrap_content"
        android:text="How do you rate Android?" />

    <RadioGroup
        android:id="@+id/radioOptions"
        android:layout_width="wrap_content"
        android:layout_height="wrap_content"
        android:orientation="horizontal" >

        <RadioButton
            android:id="@+id/radio1"
            android:layout_width="wrap_content"
            android:layout_height="wrap_content"
            android:checked="true"
            android:text="1" />

        <RadioButton
            android:id="@+id/radio2"
            android:layout_width="wrap_content"
            android:layout_height="wrap_content"
            android:text="2" />

        <RadioButton
            android:id="@+id/radio3"
            android:layout_width="wrap_content"
            android:layout_height="wrap_content"
            android:text="3" />

        <RadioButton
            android:id="@+id/radio4"
            android:layout_width="wrap_content"
            android:layout_height="wrap_content"
            android:text="4" />

        <RadioButton
            android:id="@+id/radio5"
            android:layout_width="wrap_content"
            android:layout_height="wrap_content"
            android:text="5" />
    </RadioGroup>

    <Button
        android:id="@+id/btnDisplayRating"
        android:layout_width="wrap_content"
        android:layout_height="wrap_content"
        android:text="Display Rating" />

</LinearLayout>
3.Now in the activity file let us display the text associated with the radio button selected on tapping a display rating button.

AndroidRadioActivity:

import android.app.Activity;
import android.os.Bundle;
import android.view.View;
import android.view.View.OnClickListener;
import android.widget.Button;
import android.widget.RadioButton;
import android.widget.RadioGroup;
import android.widget.Toast;

public class AndroidRadioActivity extends Activity {

 private RadioGroup radioOptions;
 private RadioButton radioButton;
 private Button btnDisplay;

 @Override
 public void onCreate(Bundle savedInstanceState) {
  super.onCreate(savedInstanceState);
  setContentView(R.layout.main);

  radioOptions = (RadioGroup) findViewById(R.id.radioOptions);
  btnDisplay = (Button) findViewById(R.id.btnDisplayRating);

  btnDisplay.setOnClickListener(new OnClickListener() {

   @Override
   public void onClick(View v) {

    int selectedId = radioOptions.getCheckedRadioButtonId();

    radioButton = (RadioButton) findViewById(selectedId);
    Toast.makeText(AndroidRadioActivity.this,
      "You Rated as " + radioButton.getText(),
      Toast.LENGTH_SHORT).show();

   }

  });
 }

}


4.Build the application and run the project. The output would be similar to the one below.

Output:

Android Vibrator Example


In this example we will learn how to make your phone to vibrate. Vibrate option is handy to providing users haptic feedback like when the phone rings,when you receive a notification may it be a message or anything. Here we will provide an example, where the phone vibrates for the given amount of time on a button press.

Android provides an abstract class Vibrator which is helpful in vibrating the device by obtaining an instance of the system vibrator with getSystemService(String) with constant VIBTRATOR_SERVICE as argument.

So lets start:

1.Create an android application project with any package and project name. Name the activity as VibratorExample and the layout file as activity_vibrator.
2.So let us design the UI for the activity with a TextView and a Button

activity_vibrator.xml:

<RelativeLayout xmlns:android="http://schemas.android.com/apk/res/android"
xmlns:tools="http://schemas.android.com/tools"
android:layout_width="fill_parent"
android:layout_height="fill_parent"
android:background="#FFFFFF"
android:paddingBottom="@dimen/activity_vertical_margin"
android:paddingLeft="@dimen/activity_horizontal_margin"
android:paddingRight="@dimen/activity_horizontal_margin"
android:paddingTop="@dimen/activity_vertical_margin"
tools:context=".Vibrator" >

<TextView
android:id="@+id/textView1"
android:layout_width="wrap_content"
android:layout_height="wrap_content"
android:layout_alignParentTop="true"
android:layout_centerHorizontal="true"
android:layout_marginTop="124dp"
android:text="Welcome to AndroidBite !!!"
android:textColor="@android:color/black"
android:textSize="20sp" />

<Button
android:id="@+id/bPressMe"
android:layout_width="wrap_content"
android:layout_height="wrap_content"
android:layout_centerHorizontal="true"
android:layout_centerVertical="true"
android:text="Press Me !!!" />

</RelativeLayout>

3.Now in the activity file create an instance for the vibrator class and call the method vibrate with the instance for the specified duration say 1000 milliseconds.

VibratorExample.java:

import android.app.Activity;
import android.content.Context;
import android.os.Bundle;
import android.os.Vibrator;
import android.view.View;
import android.view.View.OnClickListener;
import android.widget.Button;

public class VibratorExample extends Activity {

 Button bPressMe;

 @Override
 protected void onCreate(Bundle savedInstanceState) {
  super.onCreate(savedInstanceState);
  setContentView(R.layout.activity_vibrator);
  bPressMe = (Button) findViewById(R.id.bPressMe);
  bPressMe.setOnClickListener(new OnClickListener() {
   @Override
   public void onClick(View v) {

    Vibrator vibrator = (Vibrator) getSystemService(Context.VIBRATOR_SERVICE);
    vibrator.vibrate(1000);
   }
  });
 }

}


4. Add required permissions in the manifest file for vibration to occur

<uses-permission android:name="android.permission.VIBRATE" />

5.Now run the application by right clicking the project Run As->Android Application. The output will be similar to the one below. The phone vibrates for 1 sec when the button is pressed.

Output:

How to enable USB debugging mode in Jelly Bean - Android 4.2 and above Devices


In devices like Nexus 4,Nexus 7,Nexus 10 and other Android 4.2 plus devices the developer options is hidden. To make them appear in your Settings you should enable it first

Follow these steps to enable developer options:

1.Go to “Setting” in your device and tap on it.
2.Scroll down to “About Phone” and tap on it.
3.Now scroll to the bottom to find “Build Number” and tap on it 7 times ( Yeah 7 times)

If you have done it you will get a pop-up message saying “You are now a developer”. Thats it!!!

You can now see the Developer options in Settings where you can find USB Debugging.

Android Long Press Event Handle - Example


There may be situation in which your app needs to provide options to the user on long pressing a view. For example as in the messenger app, when you long press a conversation there will be a pop-up menu option to delete the conversation. Thankfully android has the View.setOnLongClickListener to handle it. In this post I will create an android application project with a simple text view on clicking the view, a toast 'Not Long Enough' is displayed and on long pressing the view a toast 'You have pressed it long' is displayed.

So lets start

1.Create an Android Application Project with any package name, any project name , activity as LogPress and layout file as activity_long_press.
2.First let us design the UI for the activity with a normal text view displaying “Long Press Me!!!”

activity_long_press.xml

<RelativeLayout xmlns:android="http://schemas.android.com/apk/res/android"
xmlns:tools="http://schemas.android.com/tools"
android:layout_width="match_parent"
android:layout_height="match_parent"
android:gravity="center"
tools:context=".LongPress" >

<TextView
android:id="@+id/txtView"
android:layout_width="wrap_content"
android:layout_height="wrap_content"
android:layout_alignParentBottom="true"
android:layout_alignParentLeft="true"
android:layout_alignParentRight="true"
android:layout_alignParentTop="true"
android:gravity="center"
android:text="Long Press Me!!!!" />

</RelativeLayout>

3.Now in the activity file handle the text views onClick and onLongClick Events like the below code.

LongPress.java:

import android.app.Activity;
import android.os.Bundle;
import android.view.View;
import android.view.View.OnClickListener;
import android.view.View.OnLongClickListener;
import android.widget.TextView;
import android.widget.Toast;

public class LongPress extends Activity {

 @Override
 protected void onCreate(Bundle savedInstanceState) {
  super.onCreate(savedInstanceState);
  setContentView(R.layout.activity_long_press);
  TextView txtView = (TextView) findViewById(R.id.txtView);
  txtView.setOnLongClickListener(new OnLongClickListener() {
   @Override
   public boolean onLongClick(View v) {
    // TODO Auto-generated method stub
    Toast.makeText(getApplicationContext(),
      "You have pressed it long :)", 2000).show();
    return true;
   }
  });
  txtView.setOnClickListener(new OnClickListener() {
   @Override
   public void onClick(View v) {
    // TODO Auto-generated method stub
    Toast.makeText(getApplicationContext(), "Not Long Enough :(",
      1000).show();
   }
  });
 }

}

4.Run the project by right-clicking project Run as → android application. The output should be similar to the one below when you long press the text view

Output:


Youtube Video in Android Application - Example


Nowadays most of the android devices ship with a youtube player in it. In this post we will see how to play a youtube video in android, provided the youtube player application is already installed in your mobile.It is done by creating an ACTION_VIEW Intent and starting the activity.This example uses a standard youtube URL

So lets Start:

1.Create an android application project with any projectname , an activity named MainActivity and a layout file named activity_main

2.Now design the UI activity_main.xml for the MainActivity.java with a button to initiate the youtube video

activity_main.xml


<RelativeLayout xmlns:android="http://schemas.android.com/apk/res/android"
    xmlns:tools="http://schemas.android.com/tools"
    android:layout_width="match_parent"
    android:layout_height="match_parent"
    android:paddingBottom="@dimen/activity_vertical_margin"
    android:paddingLeft="@dimen/activity_horizontal_margin"
    android:paddingRight="@dimen/activity_horizontal_margin"
    android:paddingTop="@dimen/activity_vertical_margin"
    tools:context=".MainActivity" >

    <Button
        android:id="@+id/button1"
        android:layout_width="wrap_content"
        android:layout_height="wrap_content"
        android:layout_centerHorizontal="true"
        android:layout_marginTop="105dp"
        android:text="Play Youtube Video" />

</RelativeLayout>

3.Now create the MainActivity with ACTION_VIEW intent to start the youtube video on clicking the button

MainActivity.java:

import android.app.Activity;
import android.content.Intent;
import android.net.Uri;
import android.os.Bundle;
import android.view.View;
import android.view.View.OnClickListener;
import android.widget.Button;

public class MainActivity extends Activity {

 Button b;

 @Override
 protected void onCreate(Bundle savedInstanceState) {
  super.onCreate(savedInstanceState);
  setContentView(R.layout.activity_main);
  b = (Button) findViewById(R.id.button1);
  b.setOnClickListener(new OnClickListener() {
   @Override
   public void onClick(View v) {
    // TODO Auto-generated method stub
    String video_path = "https://www.youtube.com/watch?v=qpQtlAW3mag";
    Uri uri = Uri.parse(video_path);
    uri = Uri.parse("vnd.youtube:" + uri.getQueryParameter("v"));
    Intent intent = new Intent(Intent.ACTION_VIEW, uri);
    startActivity(intent);
   }
  });
 }

}
4.Include internet permission <uses-permission android:name="android.permission.INTERNET"/> in your manifest file

5.Run the application in a youtube installed android device the output should be similar the the one as follows

Output:


Android - Twitter Timeline Feeds Example


Today we will see how to display Twitter Timeline feeds in an android application through API calls. In this example we will fetch the recent 10 tweets posted from BBCNews Twitter account.

So let us start:

1.Create a new project File ->New -> Project ->Android ->Android Application Project. While creating the new project, name the activity as TwitterTimelineActivity(TwitterTimelineActivity .java) and layout as main.xml.

2.Now let us design the UI for the TwitterTimelineActivity i.e main.xml with a TextView within a ScrollView. Note the attribute autoLink of the TextView is set to web to display Url links.

main.xml:
<?xml version="1.0" encoding="utf-8"?>
<LinearLayout xmlns:android="http://schemas.android.com/apk/res/android"
    android:layout_width="fill_parent"
    android:layout_height="fill_parent"
    android:orientation="vertical" >

    <ScrollView
        android:layout_width="fill_parent"
        android:layout_height="fill_parent" >


        <TextView
            android:id="@+id/tweetTextView"
            android:layout_width="fill_parent"
            android:layout_height="wrap_content"
            android:autoLink="web"
            android:background="#FFFFFF"
            android:textColor="@android:color/black" />
    </ScrollView>

</LinearLayout>
3.Now in the TwitterTimelineActivity we will call http://api.twitter.com/1/statuses/user_timeline/BBCNews.json?count=10&include_rts=1&callback=? To get the json response which will contain data like users name,id,date created text etc.. we will parse the response and fetch the date created and tweet posted and display it in the textview.To call another twitter account replace ”BBCNews” in the url with the desired account .

TwitterTimelineActivity.java
package com.twitter;

import java.io.BufferedReader;
import java.io.IOException;
import java.io.InputStream;
import java.io.InputStreamReader;
import org.apache.http.HttpEntity;
import org.apache.http.HttpResponse;
import org.apache.http.StatusLine;
import org.apache.http.client.ClientProtocolException;
import org.apache.http.client.HttpClient;
import org.apache.http.client.methods.HttpGet;
import org.apache.http.impl.client.DefaultHttpClient;
import org.json.JSONArray;
import org.json.JSONException;
import org.json.JSONObject;
import android.app.Activity;
import android.os.Bundle;
import android.widget.TextView;

public class TwitterTimelineActivity extends Activity {
 TextView tweetTextView;

 @Override
 public void onCreate(Bundle savedInstanceState) {
  super.onCreate(savedInstanceState);
  setContentView(R.layout.main);
  String twitterTimeline = getTwitterTimeline();
  try {
   String tweets = "";
   JSONArray jsonArray = new JSONArray(twitterTimeline);
   for (int i = 0; i < jsonArray.length(); i++) {
    JSONObject jsonObject = jsonArray.getJSONObject(i);
    int j = i + 1;
    tweets += "Tweet #" + j + " \n";
    tweets += "Date:" + jsonObject.getString("created_at") + "\n";
    tweets += "Post:" + jsonObject.getString("text") + "\n\n";
   }
   tweetTextView = (TextView) findViewById(R.id.tweetTextView);
   tweetTextView.setText(tweets);
  } catch (JSONException e) {
   e.printStackTrace();
  }
 }

 public String getTwitterTimeline() {
  StringBuilder builder = new StringBuilder();
  HttpClient client = new DefaultHttpClient();
  HttpGet httpGet = new HttpGet(
    "http://api.twitter.com/1/statuses/user_timeline/BBCNews.json?count=10&include_rts=1&callback=?");
  try {
   HttpResponse response = client.execute(httpGet);
   StatusLine statusLine = response.getStatusLine();
   int statusCode = statusLine.getStatusCode();
   if (statusCode == 200) {
    HttpEntity entity = response.getEntity();
    InputStream content = entity.getContent();
    BufferedReader reader = new BufferedReader(
      new InputStreamReader(content));
    String line;
    while ((line = reader.readLine()) != null) {
     builder.append(line);
    }
   } else {
    // Display couldn't obtain the data from twitter
   }
  } catch (ClientProtocolException e) {
   e.printStackTrace();
  } catch (IOException e) {
   e.printStackTrace();
  }
  return builder.toString();
 }
}
4.Make the changes in AndroidManifest.xml file by including internet permission <uses-permission android:name="android.permission.INTERNET" />

5.This project is tested in android 2.2 call the url in a separate thread in android 3.0+ if a NetworkonMainThreadExecption occurs. Run the project by rightclicking project Run as → android project.

Output:

The output of this example would be similar to the one as follows: