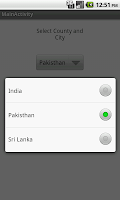
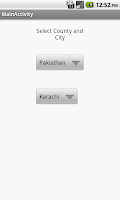
In this example we will see how to work
with spinners in android. Spinners are used for selecting one value
from a given set like the drop down list. We will create dependent
spinner i.e the entries of the second spinner depends on the value
selected in the first spinner.
In this sample application we will have
two spinner first one for selecting country and the other for
selecting city. Depending on the country selected in the first
spinner the cities in the second spinner changes.
Lets start:
1.Create an Android Application Project
(File->New->Android Application Project). While creating
the project name the Activity as MainActivity(MainActivity.java)
and the layout file as activity_main (activity_main.xml).
2.When done with creating the project
add array resources to your strings.xml file in res/values
folder which will serve as the data source for the spinners.
strings.xml:
<resources>

<string name="app_name">Spinner</string>
<string name="hello_world">Hello world!</string>
<string name="title_activity_main">MainActivity</string>

<string-array name="country_array">
<item>India</item>
<item>Pakisthan</item>
<item>Sri Lanka</item>
</string-array>
<string-array name="city_india">
<item>Mumbai</item>
<item>Chennai</item>
<item>Kolkata</item>
<item>Bangalore</item>
</string-array>
<string-array name="city_pakisthan">
<item>Karachi</item>
<item>Lahore</item>
<item>Faisalabad</item>
<item>Rawalpindi</item>
</string-array>
<string-array name="city_srilanka">
<item>Colombo</item>
<item>Dehiwala-Mount Lavinia</item>
<item>Moratuwa</item>
<item>Kotte</item>
</string-array>
</resources>
3.Design the UI with a
TextView & two Spinners and assign default entries for the
spinners.
activity_main.xml:
<?xml version="1.0" encoding="utf-8"?>
<RelativeLayout xmlns:android="http://schemas.android.com/apk/res/android"
android:layout_width="match_parent"
android:layout_height="match_parent"
android:gravity="left" >

<TextView
android:id="@+id/textView"
android:layout_width="130dp"
android:layout_height="50dp"
android:layout_alignParentTop="true"
android:layout_centerHorizontal="true"
android:layout_marginTop="15dp"
android:gravity="center"
android:text="Select County and City"
android:textSize="15dp"
/>

<Spinner
android:id="@+id/spinnerCountry"
android:layout_width="wrap_content"
android:layout_height="wrap_content"
android:layout_below="@+id/textView"
android:layout_centerHorizontal="true"
android:layout_marginTop="28dp"
android:entries="@array/country_array" />

<Spinner
android:id="@+id/spinnerCity"
android:layout_width="wrap_content"
android:layout_height="wrap_content"
android:layout_alignLeft="@+id/spinnerCountry"
android:layout_below="@+id/spinnerCountry"
android:layout_marginTop="42dp"
android:entries="@array/city_india" />

</RelativeLayout>
4.Now
in the Activity file we will create the spinners instances and change
the adapters data-source for the second spinner(city) depending on
the value selected in the first spinner(country). This is done in the
onItemSelected
callback
method of the first spinner.
MainActivity.java:
import android.app.Activity;
import android.os.Bundle;
import android.view.View;
import android.widget.AdapterView;
import android.widget.AdapterView.OnItemSelectedListener;
import android.widget.ArrayAdapter;
import android.widget.Spinner;

public class MainActivity extends Activity implements OnItemSelectedListener {

 Spinner spinnerCountry, spinnerCity;

 @Override
 protected void onCreate(Bundle savedInstanceState) {
  super.onCreate(savedInstanceState);
  setContentView(R.layout.activity_main);
  spinnerCountry = (Spinner) findViewById(R.id.spinnerCountry);
  spinnerCity = (Spinner) findViewById(R.id.spinnerCity);
  spinnerCountry.setOnItemSelectedListener(this);
 }

 @Override
 public void onItemSelected(AdapterView<?> parent, View arg1, int pos,
   long arg3) {
  parent.getItemAtPosition(pos);
  if (pos == 0) {
   ArrayAdapter<CharSequence> adapter = ArrayAdapter
     .createFromResource(this, R.array.city_india,
       android.R.layout.simple_spinner_item);
   spinnerCity.setAdapter(adapter);
  } else if (pos == 1) {
   ArrayAdapter<CharSequence> adapter = ArrayAdapter
     .createFromResource(this, R.array.city_pakisthan,
       android.R.layout.simple_spinner_item);
   spinnerCity.setAdapter(adapter);
  } else if (pos == 2) {
   ArrayAdapter<CharSequence> adapter = ArrayAdapter
     .createFromResource(this, R.array.city_srilanka,
       android.R.layout.simple_spinner_item);
   spinnerCity.setAdapter(adapter);
  }
 }

 @Override
 public void onNothingSelected(AdapterView<?> arg0) {
 }
}
5.Run
the application by right clicking the project Run As->Android
Application. You would see and output similar to the one below
Output:


