Showing posts with label acitivity. Show all posts

How to enable USB debugging mode in Jelly Bean - Android 4.2 and above Devices


In devices like Nexus 4,Nexus 7,Nexus 10 and other Android 4.2 plus devices the developer options is hidden. To make them appear in your Settings you should enable it first

Follow these steps to enable developer options:

1.Go to “Setting” in your device and tap on it.
2.Scroll down to “About Phone” and tap on it.
3.Now scroll to the bottom to find “Build Number” and tap on it 7 times ( Yeah 7 times)

If you have done it you will get a pop-up message saying “You are now a developer”. Thats it!!!

You can now see the Developer options in Settings where you can find USB Debugging.

Google Map in Android Application Example


In this sample application we wills see how to display a MapView in an android application. Of course we are going to use Google Map API library for that.

So let us start:

1.Create a new project File ->New -> Project ->Android ->Android Application Project. While creating the new project, name the application and project name as MapViewApplication , package name as you like, set the Build SDK to Google APIs (Google Inc.) (API8) and the Build Target to API8:Android 2.2(Froyo) -If you do not have these AVDs or Platforms please use SDK Manager or AVD Manager to download and install them.

2. Let the Activity name be MainActivity(MainActivity.java) and layout name be activity_main(activity_main.xml).

3. Now let us design the layout for our Activity .Note that while including the MapView tag in xml it is necessary to mention the full library path(com.google.android.maps.MapView) since it is not android defined and belongs to google. Also note that the 'android:apikey' attibute should have a valid key which should be obtained by registering a Google Map API Key Refer (How to obtain Google Map API Key for Android) to know how to obtain a google map API key

activity_main.xml
<RelativeLayout xmlns:android="http://schemas.android.com/apk/res/android"
    xmlns:tools="http://schemas.android.com/tools"
    android:layout_width="match_parent"
    android:layout_height="match_parent" >

    <com.google.android.maps.MapView
        android:id="@+id/mapview"
        android:layout_width="fill_parent"
        android:layout_height="fill_parent"
        android:apiKey="Your API Key here"
        android:clickable="true" />

</RelativeLayout>
4.Now let us use this layout in the MainActivity . This activity will extend MapActivity and must implement isRouteDisplayed() method .Press Ctrl+Shift+O for missing imports after typing the code.

MapActivity
public class MainActivity extends MapActivity {

 @Override
 public void onCreate(Bundle savedInstanceState) {
  super.onCreate(savedInstanceState);
  setContentView(R.layout.activity_main);
  MapView mapview = (MapView) findViewById(R.id.mapview);
  mapview.setBuiltInZoomControls(true);
 }

 @Override
 protected boolean isRouteDisplayed() {
  // TODO Auto-generated method stub
  return false;
 }
}
5.Make the changes in AndroidManifest.xml file by including internet permission <uses-permission android:name="android.permission.INTERNET" /> and indicate the use of google map library <uses-library android:name="com.google.android.maps" />

AndroidManifest.xml
<manifest xmlns:android="http://schemas.android.com/apk/res/android"
package="com.aj.mapviewapplication"
android:versionCode="1"
android:versionName="1.0" >

<uses-sdk
android:minSdkVersion="8"
android:targetSdkVersion="15" />
<uses-permission android:name="android.permission.INTERNET" />

<application
android:icon="@drawable/ic_launcher"
android:label="@string/app_name"
android:theme="@style/AppTheme" >
<uses-library android:name="com.google.android.maps" />
<activity
android:name=".MainActivity"
android:label="@string/title_activity_main" >
<intent-filter>
<action android:name="android.intent.action.MAIN" />
<category android:name="android.intent.category.LAUNCHER" />
</intent-filter>
</activity>
</application>

</manifest>
6.Run your Android Application by rightclicking project Run as → android project. If everything goes well you will be shown a map of North America which you can zoom in and drag around.

Output:

The output of this example would be similar to the one as follows:


Android Options Menu Example


In this example, we will be creating a simple options menu for an activity . On clicking the menu items a toast message will be shown.

So lets start:

1.Create a new project File ->New -> Project ->Android ->Android Application Project. While creating the new project, name the activity as MenuActivity(MenuActivity.java) and layout as main.xml


2.If you have the latest SDK and ADT version say (20.0.2 ). There will be a folder named menu under /res in the folder structure, you can type your menu items code there. If not create a new menu.xml file in res/layout folder , here we should use two different names for the layout files

res/layout/menu.xml or res/menu/main.xml


<menu xmlns:android="http://schemas.android.com/apk/res/android" >

    <item
        android:id="@+id/menu_one"
        android:orderInCategory="100"
        android:title="one"/>

    <item
        android:id="@+id/menu_two"
        android:icon="@drawable/ic_launcher"
        android:orderInCategory="100"
        android:title="two"/>

    <item
        android:id="@+id/menu_three"
        android:icon="@android:drawable/ic_menu_camera"
        android:orderInCategory="100"/>

    <item
        android:id="@+id/menu_four"
        android:orderInCategory="100"
        android:title="four"/>

    <item
        android:id="@+id/menu_five"
        android:orderInCategory="101"
        android:title="five"/>

    <item
        android:id="@+id/menu_six"
        android:orderInCategory="100"
        android:title="six"/>

</menu>

res/menu/main.xml


<RelativeLayout xmlns:android="http://schemas.android.com/apk/res/android"
xmlns:tools="http://schemas.android.com/tools"
android:layout_width="fill_parent"
android:layout_height="fill_parent" >

<TextView
android:layout_width="wrap_content"
android:layout_height="wrap_content"
android:layout_centerHorizontal="true"
android:layout_centerVertical="true"
android:text="@string/hello_world"
tools:context=".MenuActivity" />

</RelativeLayout>

3.Now let us bind our UI layout files with the activity. To do so we override onCreateOptionsMenu(Menu menu) and onOptionsItemSelected(MenuItem item) methods in MenuActivity.java file.Press Ctrl+Shift+O for missing imports after typing the code

MenuActivity.java

public class MenuActivity extends Activity {

 @Override
 public void onCreate(Bundle savedInstanceState) {
  super.onCreate(savedInstanceState);
  setContentView(R.layout.main);
 }

 @Override
 public boolean onCreateOptionsMenu(Menu menu) {
  getMenuInflater().inflate(R.menu.main, menu); // or use->
  // getMenuInflater().inflate(R.layout.menu,
  // menu);
  return true;
 }

 @Override
 public boolean onOptionsItemSelected(MenuItem item) {
  // TODO Auto-generated method stub
  switch (item.getItemId()) {
  case R.id.menu_one:
   Toast.makeText(MenuActivity.this, "One is Selected",
     Toast.LENGTH_SHORT).show();
   return true;

  case R.id.menu_two:
   Toast.makeText(MenuActivity.this, "Two with icon is Selected",
     Toast.LENGTH_SHORT).show();
   return true;

  case R.id.menu_three:
   Toast.makeText(MenuActivity.this, "Icon is Selected",
     Toast.LENGTH_SHORT).show();
   return true;

  case R.id.menu_four:
   Toast.makeText(MenuActivity.this, "Four is Selected",
     Toast.LENGTH_SHORT).show();
   return true;

  case R.id.menu_five:
   Toast.makeText(MenuActivity.this, "Five is Selected",
     Toast.LENGTH_SHORT).show();
   return true;

  case R.id.menu_six:
   Toast.makeText(MenuActivity.this, "Six is Selected",
     Toast.LENGTH_SHORT).show();
   return true;

  default:
   return super.onOptionsItemSelected(item);
  }

 }

}

4.Run the project by rightclicking project Run as → android project. If observed carefully the menu item six would be in front of five that is because we have the orderInCategory level of five greater than that of menu item six. We have also tried menus with icon,text and icon with text.

Output:

The output of this example would be as follows

Splash Screen for Android Application - Example

Adding a splash screen for your application is necessary if your application takes more time to load. It is similar to the PC games we play where you would see the brand of the gaming company before the actual game commences.

Here in this example we will create an activity to display your splash screen with progress bar for two seconds . After two seconds the user will be directed to the main page.

So lets start:

1. Create a new project File -> Android Project. While creating a new project name the as SplashScreenActivity(SplashScreenActivity.java).Press Ctrl+Shift+O for missing imports after typing the code

SplashScreenActivity.java


public class SplashScreenActivity extends Activity {
 private long ms = 0;
 private long splashDuration = 2000;
 private boolean splashActive = true;
 private boolean paused = false;

 @Override
 protected void onCreate(Bundle savedInstanceState) {
  super.onCreate(savedInstanceState);
  setContentView(R.layout.splashscreen);
  Thread mythread = new Thread() {
   public void run() {
    try {
     while (splashActive && ms < splashDuration) {
      if (!paused)
       ms = ms + 100;
      sleep(100);
     }
    } catch (Exception e) {
    } finally {
     Intent intent = new Intent(SplashScreenActivity.this,
       MainActivity.class);
     startActivity(intent);
    }
   }
  };
  mythread.start();
 }
}

2. Now you need to create user interface for the SplashScreenActivity.java
3. Create a new xml file in layout folder as splashscreen.xml

splashscreen.xml


<?xml version="1.0" encoding="utf-8"?>
<LinearLayout xmlns:android="http://schemas.android.com/apk/res/android"
    android:layout_width="fill_parent"
    android:layout_height="fill_parent"
    android:orientation="vertical" >

    <ImageView
        android:id="@+id/image"
        android:layout_width="wrap_content"
        android:layout_height="300dp"
        android:src="@drawable/androidbite" />

    <ProgressBar
        android:id="@+id/progressBar1"
        android:layout_width="wrap_content"
        android:layout_height="wrap_content"
        android:layout_below="@id/image"
        android:layout_gravity="center_horizontal" >
    </ProgressBar>

</LinearLayout>

4. Now that the splash screen is ready lets create the main activity(MainActivity.java) and layout for the main activity (main.xml)

MainActivity.java

public class MainActivity extends Activity {

 @Override
 protected void onCreate(Bundle savedInstanceState) {
  super.onCreate(savedInstanceState);
  setContentView(R.layout.main);
 }
}
main.xml

<?xml version="1.0" encoding="utf-8"?>
<RelativeLayout xmlns:android="http://schemas.android.com/apk/res/android"
    android:layout_width="fill_parent"
    android:layout_height="fill_parent"
    android:orientation="vertical" >

    <TextView
        android:id="@+id/textView1"
        android:layout_width="wrap_content"
        android:layout_height="wrap_content"
        android:layout_alignParentTop="true"
        android:layout_centerHorizontal="true"
        android:layout_marginTop="181dp"
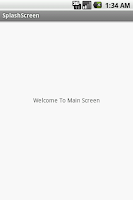
        android:text="Welcome To Main Screen" />

</RelativeLayout>
5.Here come the most important part, include all your activity in manifest file. In addition to that put android:noHistory=”true” attribute in the SplashScreenActivity's tag so that the activity will not appear in the activity stack, meaning if the user presses back from the main activity its should not direct the user to splash screen.


AndroidManifest.xml

<manifest xmlns:android="http://schemas.android.com/apk/res/android"
    package="com.androidbite.splashscreen"
    android:versionCode="1"
    android:versionName="1.0" >

    <uses-sdk
        android:minSdkVersion="7"
        android:targetSdkVersion="15" />

    <application
        android:icon="@drawable/ic_launcher"
        android:label="@string/app_name"
        android:theme="@style/AppTheme" >

        <activity
            android:name=".SplashScreenActivity"
            android:label="@string/title_activity_splashscreen"
            android:noHistory="true" >

            <intent-filter>

                <action android:name="android.intent.action.MAIN" />

                <category android:name="android.intent.category.LAUNCHER" />
            </intent-filter>
        </activity>

        <activity
            android:name=".MainActivity"
            android:label="@string/title_activity_splashscreen" />
    </application>

</manifest>


Output:

The output of this example would be as follows


Android switching activity and sending data - Example


There may be situation where you want to send data from one activity to another while switching from one activity to another. The following is a simple example where you can enter your name and age in the first screen and receive it at the second screen on click of a button.

So lets start .

1. Create a new project File -> Android Project. While creating a new project give activity name as FirstActivity(FirstActivity.java).
2. Now you need to create user interface for the FirstActivity.java
3. Create a new xml file in layout folder or rename the main.xml to first.xml
4. Now insert the following code in first.xml to design a small layout. This layout contains two edittext and a button.


First.xml

<?xml version="1.0" encoding="utf-8"?>
<LinearLayout xmlns:android="http://schemas.android.com/apk/res/android"
    android:layout_width="fill_parent"
    android:layout_height="fill_parent"
    android:orientation="vertical" >

    <TextView
        android:layout_width="fill_parent"
        android:layout_height="wrap_content"
        android:text="Name: " />

    <EditText
        android:id="@+id/name"
        android:layout_width="fill_parent"
        android:layout_height="wrap_content"
        android:layout_marginBottom="10dip" />

    <TextView
        android:layout_width="fill_parent"
        android:layout_height="wrap_content"
        android:text="Age: " />

    <EditText
        android:id="@+id/age"
        android:layout_width="fill_parent"
        android:layout_height="wrap_content"
        android:layout_marginBottom="10dip"
        android:inputType="number" />

    <Button
        android:id="@+id/btnNextScreen"
        android:layout_width="fill_parent"
        android:layout_height="wrap_content"
        android:layout_marginTop="15dip"
        android:text="Send Data" />

</LinearLayout>


5.Now open your FirstActivity.java and Type the following code. In the following code we are creating a new Intent and passing parameters on clicking button.

import android.app.Activity;
import android.content.Intent;
import android.os.Bundle;
import android.util.Log;
import android.view.View;
import android.widget.Button;
import android.widget.EditText;

public class FirstActivity extends Activity {
 // Initializing variables
 EditText inputName;
 EditText inputAge;

 @Override
 public void onCreate(Bundle savedInstanceState) {
  super.onCreate(savedInstanceState);
  setContentView(R.layout.first);
  inputName = (EditText) findViewById(R.id.name);
  inputAge = (EditText) findViewById(R.id.age);
  Button btnNextScreen = (Button) findViewById(R.id.btnNextScreen);
  // Listening to button event
  btnNextScreen.setOnClickListener(new View.OnClickListener() {
   public void onClick(View arg0) {
    // Starting a new Intent
    Intent nextScreen = new Intent(getApplicationContext(),
      SecondActivity.class);
    // Sending data to another Activity
    nextScreen.putExtra("name", inputName.getText().toString());
    nextScreen.putExtra("age", inputAge.getText().toString());
    startActivity(nextScreen);
   }
  });
 }
}


  1. Create a class called SecondActivity.java. And an xml file named second.xml
SecondActivity.java.

import android.app.Activity;
import android.content.Intent;
import android.os.Bundle;
import android.util.Log;
import android.view.View;
import android.widget.Button;
import android.widget.TextView;

public class SecondActivity extends Activity {
 /** Called when the activity is first created. */
 @Override
 public void onCreate(Bundle savedInstanceState) {
  super.onCreate(savedInstanceState);
  setContentView(R.layout.second);
  TextView txtName = (TextView) findViewById(R.id.txtName);
  TextView txtEmail = (TextView) findViewById(R.id.txtAge);
  Button btnBack = (Button) findViewById(R.id.btnBack);
  Intent i = getIntent();
  // Receiving the Data
  String name = i.getStringExtra("name");
  String age = i.getStringExtra("age");
  Log.e("Second Screen", name + "." + age);
  // Displaying Received data
  txtName.setText(name);
  txtEmail.setText(age);
  // Binding Click event to Button
  btnBack.setOnClickListener(new View.OnClickListener() {
   public void onClick(View arg0) {
    // Closing SecondScreen Activity
    finish();
   }
  });
 }
}


second.xml
<?xml version="1.0" encoding="utf-8"?>
<LinearLayout xmlns:android="http://schemas.android.com/apk/res/android"
    android:layout_width="fill_parent"
    android:layout_height="fill_parent"
    android:orientation="vertical" >

    <TextView
        android:id="@+id/txtName"
        android:layout_width="fill_parent"
        android:layout_height="wrap_content"
        android:layout_margin="15dip"
        android:textSize="18dip" />

    <TextView
        android:id="@+id/txtAge"
        android:layout_width="fill_parent"
        android:layout_height="wrap_content"
        android:layout_margin="15dip"
        android:textSize="18dip" />

    <Button
        android:id="@+id/btnBack"
        android:layout_width="fill_parent"
        android:layout_height="wrap_content"
        android:layout_marginTop="15dip"
        android:text="Back" />

</LinearLayout>


  1. Open you AndroidManifest.xml file and modify the code as below in application tag

    <application
        android:icon="@drawable/ic_launcher"
        android:label="@string/app_name" >
    
        <activity
            android:name=".FirstActivity"
            android:label="@string/app_name" >
    
            <intent-filter>
    
                <action android:name="android.intent.action.MAIN" />
    
                <category android:name="android.intent.category.LAUNCHER" />
            </intent-filter>
        </activity>
    
        <activity
            android:name=".SecondActivity"
            android:label="@string/app_name" />
    
    </application>
    

    8.Run your project by right clicking on your project folder -> Run As -> 1 Android Application.

The below image is output of this example